
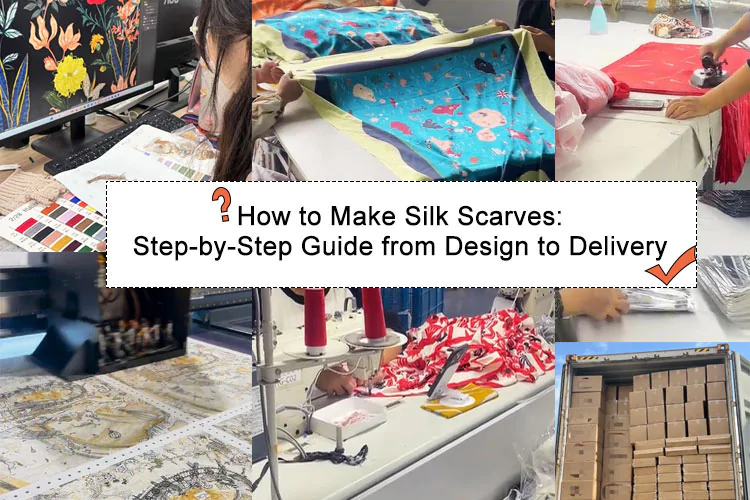
Introduction
In a world where individuality and self-expression are cherished, fashion has become a powerful medium to make a statement and stand out from the crowd. Amidst this desire to be unique, custom printed kimono have emerged as wearable masterpieces, transforming art into a captivating form that adorns our bodies.
Printed kimonos are more than just garments; they are a harmonious fusion of artistic expression and personal style. By infusing intricate designs, vibrant colors, and mesmerizing patterns onto the fabric, printed kimonos transcend the boundaries of traditional fashion. They allow us to showcase our individuality, captivate attention, and embrace our own distinctiveness.
When we wear a printed kimono, we become walking canvases, effortlessly displaying art in motion. These wearable artworks reflect our inner creativity, passions, and unique perspectives. They give us the freedom to break away from conventional fashion norms, enabling us to be authentic and express ourselves in a way that words alone cannot convey.
The artistry behind custom printed kimono is truly captivating. Artists and designers pour their creativity and skill into transforming an idea, a vision, or a painting into a fabric-based reality. Through various printing techniques such as digital printing or screen printing, these masterpieces come to life, ready to be worn and admired by those who appreciate the beauty of wearable art.
One of the most remarkable aspects of printed kimonos is their ability to help us stand out in a sea of conformity. In a world where trends come and go, wearing a printed kimono sets us apart, allowing us to make a distinctive mark on any occasion. The eye-catching colors, unique patterns, and artistic designs become our personal style signature, ensuring that we leave a lasting impression wherever we go.
Moreover, the allure of custom printed kimonos lies in their ability to empower us. By adorning ourselves with these wearable artworks, we feel a surge of confidence and self-assurance. The compliments and curious glances from others serve as a testament to our boldness and individuality.
Whether it’s attending a social gathering, exploring a bustling city, or simply enjoying a leisurely day, a printed kimono elevates our fashion choices to new heights. Its versatility allows us to experiment with various looks and effortlessly transition from casual to elegant, blending seamlessly with our personal aesthetic.
As we delve into the world of custom printed kimonos, we embark on a journey that connects us with art, culture, and the captivating stories behind each design. We become part of a vibrant community of individuals who appreciate the transformative power of fashion and the ability of printed kimonos to turn art into wearable masterpieces.
In this article, we will provide a comprehensive guide on how to custom print kimonos, offering you insights into the entire process from start to finish.
Step 1: Design Selection

Choosing the right design is a crucial step in creating a custom-printed kimono that truly reflects your personal style and preferences. Here’s why design selection is important and some helpful tips to guide you:
- Importance of Design Selection: The design you choose sets the tone and visual impact of your custom-printed kimonos/kaftans. It becomes the centerpiece, defining the overall aesthetic and making a statement. Whether you opt for intricate patterns, bold motifs, or subtle minimalism, the design becomes an extension of your personality and a means of self-expression.
- Reflecting Your Style and Preferences: Consider your individual style and preferences when selecting a design. Are you drawn to vibrant colors, geometric shapes, or delicate floral motifs? Pay attention to patterns, themes, and imagery that resonate with you. Your custom-printed kimonos should be a reflection of your unique taste and personality.
- Seeking Inspiration: Look for inspiration in various sources, such as art, nature, culture, or your own creative ideas. Explore different design styles, historical patterns, or contemporary trends. Collect images, create mood boards, or sketch your own concepts. Allow your imagination to roam freely and gather inspiration from diverse sources.
- Consider the Kimono’s Purpose: Determine the purpose of your custom-printed kimono. Will it be worn for special occasions, everyday wear, or as a statement piece? Consider the context in which you plan to wear the kimono and select a design that aligns with the intended use.
- Balance and Proportion: Keep in mind the balance and proportion of the design on the kimono. Consider how the design elements will flow across the fabric and how they will look when the kimono is worn. Ensure that the design is visually appealing and harmonious, considering the placement of motifs and patterns.
- Customization and Personalization: If you’re feeling adventurous, consider customizing the design by collaborating with artists or designers. They can help bring your vision to life or create a design exclusively tailored to your preferences. Collaborative efforts can result in a truly unique and personalized custom-printed kimono.
- Trust Your Instincts: Ultimately, trust your instincts when selecting a design. Choose what speaks to you and makes you excited to wear the kimono. Your intuition often guides you towards designs that resonate with your authentic self and reflect your inner creativity.
Certainly! If you don’t have any design sketches/patterns, you can let us know your ideas and color preferences. Our professional design team will create design drafts and style options based on your requirements. We will provide you with the drawings for your confirmation to ensure 100% satisfaction and create the ideal custom-printed kimonos you desire.
Step 2: Fabric Selection
When it comes to custom printed kimonos, choosing the right fabric is crucial. The fabric not only affects the overall look and feel of the garment but also determines its comfort, durability, and how the design will appear when printed. Here are some fabric options to consider and factors to guide you in selecting the perfect fabric for your custom printed kimono:
- Viscose/Rayon: Moreover, we offer multiple options when it comes to viscose/rayon fabrics. For those who prefer lightweight options, we recommend choosing light plain viscose. If you appreciate textured fabrics, we have options with a textured surface. And for slightly thicker options, such as for the autumn season, we suggest crinkle viscose. Of course, depending on your specific needs, we have a wide range of viscose/rayon fabrics available for selection. Below are our normal different viscose fabrics to be made into printed kimonos for your reference.


- Polyester: Polyester fabrics are popular for their versatility, durability, and ease of care. They are more affordable than silk and can mimic its appearance to some extent. Polyester kimonos are resistant to wrinkling and offer excellent color retention, ensuring that the printed design remains vibrant and sharp over time. Usually, polyester voile, polyester chiffon, polyester satin, polyester crepe, etc.
- Silk: Compared to any other fabric, silk is undoubtedly the fabric with the best color saturation for all fabric printing. Its smooth surface and cool sensation make it an excellent choice for creating printed kimonos using silk fabric. However, it is important to note that silk fabric can be quite expensive, making it more suitable for high-end consumers.
- Blends: Fabric blends, such as silk blends or polyester blends, combine the desirable qualities of different materials. For example, a silk blend may offer the luxurious feel of silk with added durability and wrinkle resistance from another fiber, such as silk/cotton, silk/modal, silk/viscose, etc. Blends can provide a balance of comfort, durability, and cost-effectiveness.
- Sustainable fabrics: Considering the impact on the environment, an increasing number of customers are opting for renewable fabrics. In this regard, we offer our customers a variety of choices. Some examples include recycled polyester, eco-vero viscose, Lenzing modal, organic cotton, and more. These sustainable fabric options provide eco-friendly alternatives, promoting responsible consumption and reducing the carbon footprint associated with the production of printed kimonos.
Step 3: Artwork Submission

Once you have finalized your design for the custom-printed kimono, it’s essential to properly prepare your design files for submission to the factory. Here’s a guide to help you with the artwork submission process:
- File Formats: Most printing factories accept common file formats such as AI and PDF. These formats ensure compatibility and ease of processing. Check with the specific factory you’re working with to confirm their preferred file formats.
- Resolution: To achieve a high-quality print, ensure that your design file has a sufficient resolution. Aim for a resolution of at least 300 dots per inch (DPI) or higher. This ensures crisp and sharp details in the final print. Avoid low-resolution images as they may result in pixelation or loss of clarity.
- Color Mode: Convert your design file to the appropriate color mode. Most printing processes utilize the CMYK color mode (cyan, magenta, yellow, and key/black). Convert your design from RGB (common for digital screens) to CMYK to ensure accurate color representation in the printed kimono. Certainly, offering Pantone color number or offering a swatch for each color is best.
- Bleed and Trim: Consider including a bleed area in your design file. A bleed extends the design slightly beyond the actual trim size, ensuring that there are no white borders after cutting. Consult the factory’s guidelines for the specific bleed size and trim marks they require.
- Layered Files: If your design consists of multiple layers or contains transparency, it’s advisable to submit the layered file (e.g., PSD or AI) alongside a flattened version (e.g., JPEG or PDF). This allows the factory to make adjustments or modifications if necessary.
- Design Placement and Dimensions: Clearly indicate the desired placement and dimensions of your design within the kimono. Provide measurements or a visual reference to ensure accurate positioning during the printing process. This helps the factory understand your vision and bring it to life effectively.
- Follow Factory Guidelines: Every printing factory may have specific requirements and guidelines for artwork submission. These can include file size limitations, color specifications, or any other technical considerations. Review the factory’s guidelines thoroughly and ensure compliance to avoid any potential issues or delays.
- Proofing and Approval: Before initiating the full-scale production, request a strike-off sample of the printed design on fabric. Carefully review it to ensure that the colors, placement, and overall quality align with your expectations. Provide feedback or approval promptly to proceed with production.
Step 4: Proofing and Sampling
Once the factory creates a proof or sample of the printed design on fabric, it is crucial to review it carefully. This step allows you to assess the accuracy and quality of the print and ensure that it aligns with your vision. Here’s why proofing and sampling are important and how to provide effective feedback to collaborate with the factory:
- Importance of Reviewing Proofs and Samples: Reviewing proofs or samples is essential to ensure that the final printed kimono meets your expectations. It provides an opportunity to detect any discrepancies, evaluate the colors, assess the placement of the design, and examine the overall quality. This step allows for necessary adjustments and ensures that the final product accurately reflects your vision.
- Assessing Colors and Design Accuracy: Compare the colors in the proof or sample with the original design. Ensure that the colors are vibrant, accurate, and consistent with your expectations. Pay attention to any variations in color due to different printing techniques or fabric types. Evaluate the design’s placement, size, and orientation to confirm that it matches your intended vision.
- Checking for Quality and Detail: Examine the quality and detail of the printed design. Look for sharpness, clarity, and fine lines. Assess the overall resolution and ensure that the design is reproduced with precision. Evaluate the fabric’s texture, feel, and any finishing details, such as stitching or hems.
- Providing Clear and Constructive Feedback: When providing feedback, be specific and detailed about any desired adjustments or modifications. Clearly communicate any changes you would like to see in the color, design placement, size, or overall quality. Use visual references, such as annotated images or marked-up samples, to illustrate your feedback effectively.
- Collaborating with the Factory: Maintain open and proactive communication with the factory throughout the feedback process. Establish a collaborative partnership by sharing your vision, preferences, and desired outcome. Discuss any concerns or questions you may have, and seek their expertise and advice to achieve the best possible result. Collaboration helps ensure that the factory understands your expectations and can make necessary adjustments.
- Prompt Feedback and Approval: Timely feedback is crucial to avoid delays in production. Provide feedback promptly, so the factory can address any concerns or make adjustments as needed. If you are satisfied with the proof or sample, give your approval for the full-scale production to proceed.
By carefully reviewing proofs or samples and providing clear and constructive feedback, you can collaborate effectively with the factory to achieve the desired result for your custom-printed kimono. Effective communication and an open partnership with the factory will help ensure that the final product meets your expectations and brings your design to life in the most accurate and satisfying way.
Step 5: Production and Printing
Once you have approved the proof or sample of your custom-printed kimono, the full-scale production process begins. This step involves the actual printing of your approved design onto the chosen fabric. Here’s an overview of the production and printing process, highlighting the importance of the factory’s expertise:
- Preparing the Printing Setup: The factory prepares the printing setup by configuring the printing equipment, such as digital printers or screens, and ensuring that they are calibrated and ready for accurate reproduction of your design.
- Color Management: The factory carefully manages color calibration to ensure the accurate reproduction of colors from the approved proof or sample. They follow precise color profiles and techniques to achieve the desired color vibrancy and consistency throughout the printing process.
- Fabric Preparation: The chosen fabric for your custom-printed kimono goes through preparation processes such as pre-treatment, washing, or heat-setting, depending on the specific fabric requirements. These steps ensure that the fabric is clean, stable, and ready to receive the printed design.
- Printing Techniques: The factory employs various printing techniques, such as digital printing or screen printing, depending on the chosen fabric and design complexity. Digital printing offers versatility and is suitable for detailed or multicolored designs, while screen printing excels in producing vibrant and opaque prints.
- Printing the Design: The approved design is meticulously printed onto the fabric, following precise instructions on color placement, design orientation, and size. The factory’s expertise and attention to detail ensure that the design is accurately transferred from the digital file to the fabric, resulting in a high-quality print.
- Drying and Curing: After printing, the fabric undergoes a drying and curing process to set the ink and ensure its durability. This step is vital for achieving long-lasting colorfastness and maintaining the integrity of the printed design.
- Quality Control: The factory conducts rigorous quality control checks throughout the production process. They inspect the printed fabric for any imperfections, color inconsistencies, or flaws. This step ensures that the final product meets the highest standards of quality and craftsmanship.
- Additional Finishing: Depending on the specific requirements, the factory may perform additional finishing touches, such as heat pressing, fabric treatments, or post-printing processes. These steps contribute to the overall aesthetics and longevity of the custom-printed kimono.
Step 6: Quality Control

To ensure that the printed fabric for your custom kimono meets your expectations and maintains a high level of quality, the factory implements robust quality control procedures. This essential step helps identify and address any potential issues, ensuring that the final product is flawless and meets your desired standards. Here’s an explanation of the factory’s quality control procedures and their importance:
- Inspection of Printed Fabric: The factory conducts a thorough inspection of the printed fabric, examining it for any imperfections, defects, or inconsistencies. This includes scrutinizing the print quality, color accuracy, and overall visual appearance of the fabric.
- Color Consistency: The factory compares the printed fabric against the approved proof or sample to verify color consistency. They ensure that the colors match your desired specifications and that there are no variations or discrepancies that may affect the overall aesthetic of the custom printed kimono.
- Quality Assurance Testing: The printed fabric may undergo additional quality assurance testing to assess its durability, colorfastness, and washability. These tests help ensure that the fabric can withstand regular use and maintain its vibrant colors and structural integrity over time.
- Precision and Detail Checks: The factory pays close attention to the precision and detail of the printed design. They examine the clarity of lines, sharpness of edges, and overall reproduction of intricate elements to ensure that the design is faithfully represented on the fabric.
- Consistency Across Multiple Pieces: In cases where multiple pieces of fabric are printed for a single order, the factory ensures consistency across all pieces. They compare the printed fabrics against each other to verify that the design, color, and overall quality are uniform.
- Finishing and Presentation: As part of quality control, the factory examines the finishing and presentation of the printed fabric. They check for any loose threads, uneven hems, or other potential issues that may impact the final appearance and wearability of the custom printed kimono.
Step 7: Cutting and Sewing

Once the fabric with the printed design is ready, it undergoes the cutting and sewing process to transform it into a kimono. This step involves skilled garment workers who specialize in kimono production. Here’s an overview of the cutting and sewing process and the importance of these skilled artisans:
- Pattern Preparation: Skilled pattern makers create or use existing patterns specifically designed for kimonos. These patterns serve as templates for cutting the fabric and ensure consistency in sizing and construction.
- Fabric Layout and Cutting: The printed fabric is carefully laid out, taking into consideration the design placement and pattern orientation. Skilled workers trace the pattern onto the fabric and meticulously cut each piece to the precise dimensions required for the kimono.
- Assembly and Seam Sewing: The cut fabric pieces are then meticulously assembled according to the pattern. Skilled garment workers employ their expertise to align the seams accurately, ensuring a precise fit and clean lines. They use specialized sewing techniques specific to kimono construction.
- Detailing and Finishing: The garment workers pay attention to the fine details and finishing touches of the kimono. This includes sewing hems, attaching collars or lapels, and adding any decorative elements like sashes or ties. Skilled artisans ensure that every stitch is precisely executed to achieve a polished and professional result.
- Fitting and Adjustments: Skilled garment workers may perform fittings and adjustments during the sewing process. This allows them to ensure the kimono fits well and drapes gracefully on the wearer. They may make slight alterations to achieve the desired fit and comfort.
- Attention to Traditions and Techniques: Skilled garment workers who specialize in kimono production possess a deep understanding of the traditional construction techniques and cultural significance of kimonos. They honor these traditions while incorporating modern production methods, ensuring that the final kimono embodies both heritage and contemporary style.
Step 8: Final Touches
The final touches of a printed kimono play a crucial role in perfecting its overall appearance and enhancing its uniqueness. Attention to detail is key in this stage, ensuring that every aspect of the kimono is meticulously crafted. Here are some additional steps and embellishments that contribute to the finishing of a printed kimono:
- Edging and Binding: The edges of the kimono, such as the sleeves and hemline, may receive special attention through edging or binding techniques. This involves adding decorative trims, contrasting fabric strips, or delicate stitching to provide an elegant and polished finish.
- Embroidery or Embellishments: Custom printed kimonos can be further embellished with intricate embroidery, beadwork, sequins, or other decorative elements. These additions can accentuate specific design elements or add a touch of opulence and texture to the kimono.
- Lining: Lining the kimono is an important step that adds comfort, structure, and durability. The lining fabric is carefully chosen to complement the outer fabric and enhance the overall drape and feel of the kimono. Skilled artisans ensure that the lining is meticulously sewn and perfectly aligned.
- Fittings and Fastenings: Depending on the style of the kimono, it may feature traditional Japanese fastenings such as obi belts, ties, or buttons. These fittings are carefully attached, ensuring proper functionality and an aesthetically pleasing appearance.
- Pressing and Ironing: The final step in perfecting the custom printed kimono involves meticulous pressing and ironing. Skilled artisans use specialized techniques to ensure that the fabric lies smoothly and any creases or wrinkles are eliminated. This step enhances the overall presentation and gives the kimono a polished and professional look.
- Quality Assurance: Throughout the finishing process, quality assurance checks are conducted to ensure that the final product meets the highest standards. Skilled artisans carefully inspect each kimono, paying attention to details such as stitching, embellishments, alignment, and overall quality. Any imperfections or inconsistencies are addressed before the kimono is deemed ready for delivery.
The attention to detail in the final touches of a custom printed kimono is paramount. Skilled artisans pour their expertise and craftsmanship into every stitch, ensuring that the kimono is a true masterpiece. The embellishments, lining, fittings, and overall finishing elevate the kimono to a wearable work of art, showcasing the precision and dedication of those involved in its creation.
By meticulously refining each element and embracing the pursuit of perfection, the final touches complete the custom printed kimono, transforming it into a garment that embodies beauty, artistry, and impeccable craftsmanship.
Step 9: Packaging and Delivery
Once the custom printed kimonos are completed and ready for delivery, the factory takes careful measures to ensure that they are packaged securely and protected during transit. Here’s an overview of how the factory packages the kimonos and guidance on coordinating shipping or pickup arrangements:
- Packaging for Protection: The factory packages each custom printed kimono with utmost care to safeguard it from damage. They use appropriate packaging materials such as tissue paper, plastic covers, or garment bags to prevent any potential tears, stains, or other mishaps during transportation.
- Securing the Package: To further protect the custom printed kimonos, the factory ensures that the packaging is secure. This may involve using tapes, seals, or fasteners to keep the package intact and prevent any unwanted movement or exposure.
- Coordinating Shipping or Pickup: Depending on your preferences and arrangements with the factory, you can coordinate the shipping or pickup of the custom printed kimonos. Communicate with the factory to determine the most suitable shipping method, carrier, and any additional requirements or preferences you may have.
- Shipping Insurance: Consider obtaining shipping insurance to protect your investment. This can provide coverage in case of any unforeseen circumstances during transit, ensuring that you are financially protected in case of loss, damage, or theft.
- Tracking and Delivery Updates: Request tracking information from the factory or the shipping carrier to keep track of your custom printed kimono’s journey. Stay informed about the estimated delivery date and any updates on the package’s status to anticipate its arrival.
- Receiving the Package: Once the custom printed kimono arrives, inspect the package for any signs of damage or tampering before accepting it. If you notice any issues, document them and contact the shipping carrier or the factory immediately to initiate the necessary steps for resolution.
- Unpacking and Care Instructions: When unpacking the printed kimono, handle it with care to avoid any accidental damage. Remove any packaging materials gently and follow any care instructions provided by the factory. Proper care ensures that your printed kimono maintains its quality and appearance over time.
Step 10: Final Inspection
In the final stage of production, the factory arranges for a comprehensive inspection based on the AQL (Acceptable Quality Level) 2.5 or the customer’s specified standards. Alternatively, customers can appoint a third-party inspection agency to conduct the inspection. Following the inspection, a complete inspection report is generated, indicating that the products have passed the inspection. Only after this final inspection and the issuance of a passed inspection report, can the products be shipped out.
The final inspection is a crucial step in ensuring that the printed kimonos meet the required quality standards. It helps identify any potential defects, inconsistencies, or deviations from the agreed-upon specifications. By adhering to stringent inspection procedures, the factory maintains a high level of quality control, providing assurance to the customers that they will receive products of the desired quality.
Conclusion
In conclusion, the custom printing process for kimonos with a factory opens up a world of creative possibilities, allowing you to transform your unique designs into wearable art. Throughout this blog post, we have explored the various steps involved in custom printing kimonos, from design selection to packaging and delivery.
So whether you are a designer eager to turn your artwork into printed kimonos or a wholesaler seeking a factory to create custom-printed kimonos for your business, this blog post has provided comprehensive information on every step of the custom-printed kimono process.
From design selection to packaging and delivery, we have covered the entire journey of creating custom-printed kimonos. We discussed the importance of fabric selection, preparing artwork for submission, proofing and sampling, production and printing, cutting and sewing, as well as final touches and quality control.
By following the guidelines and tips provided in this blog post, you can make informed decisions throughout the process.


